Calendar
Info Select includes a Calendar which allows you to schedule and plan your daily events such as meetings, appointments, birthdays, tasks, ticklers, and other occasions.
Intro to the Calendar
Intro to the Calendar
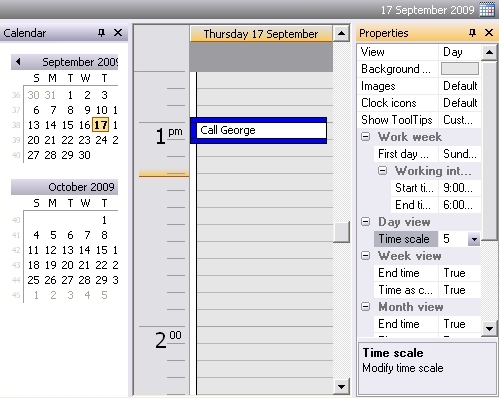
The Calendar contains:
Planner View – the main part of the Calendar View. This is the view that lets you schedule events.
Calendar Bar (Date Picker) – by default is docked along the left edge of the Calendar View. This view lets you select a specific day or range of days to be displayed in the Planner.
Properties Bar – by default is docked along the right edge of the Calendar View. This view lets you quickly change settings for displaying Planner (for example, switch the Planer to Daily, Weekly or Monthly view)
Calendars can show up in general searches just as Notes and other items.
The Calendar is just like any other item in Info Select – you can have as many as you wish and the data is stored in its parent File.
Calendar Navigation
Calendar Navigation
The Info Select Calendar provides several ways for selecting days and altering the display:
[:] To move from one month to another:
- Use the
 and
and  buttons in the Calendar Bar to step to the prior or next month.
or
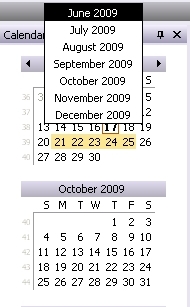
- Click on the Month name in the Calendar Bar to choose the month from a drop-down list.
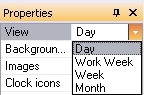
[:] To switch the Planner between Day, 5-Days Work Week, Week or Month View:
- Click the drop-down box at the right side of the View field in the Properties Bar and choose Day, Work Week, Week or Month.
You can select a range of days in the Calendar Bar to show them in the Planner window.
[:] To navigate to the Today
- Right-click on the Planner window and choose Today from the pop-up menu
[:] To navigate to the specific date
- Select the date in the Calendar Bar
or
- Right-click on the Planner window.
- Choose Go To Date… from the pop-up menu. A dialog box appears.
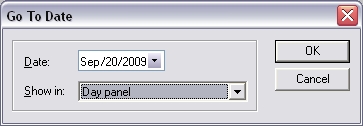
- Enter the desired date manually or click the drop-down box to select a date from the calendar.
- If desired, change the Show in option to display the date in Day, Work Week, Week or Month View.
- Click OK.
For convenience in scheduling and checking appointments in the Month View, the Planner displays part of the previous and following month.
Viewing a Calendar
Viewing a Calendar
You can view a Calendar to review scheduled events.
[:] To view a Calendar:
- Choose Menu Ribbon | Home | Calendar and adjust the size and position using the mouse or from the Selector, click the Calendar icon
 .
.
Note: Usually you only need one Calendar. If you have more than one calendar, pressing the Calendar toolbar button will cycle to the next Calendar in the Selector. Other Calendars will have the ![]() icon to distinguish them from your Main calendar. You can set any Calendar as your Main by right-clicking on the Calendar in the Selector and choosing Set Main Calendar.
icon to distinguish them from your Main calendar. You can set any Calendar as your Main by right-clicking on the Calendar in the Selector and choosing Set Main Calendar.
Viewing the Calendar as an Outline
Info Select allows to view the Calendar events in the Selector as an Outline. Simply expand the Calendar item to view the Calendar entries grouped by Year, Month and Day. This allows you to work with your Calendar in the same way as you work with Topics. For example, you can locate tasks scheduled on December, 15, 2003 by expanding the Calendar and going into the corresponding Topic, or move an event to another month or day by dragging it to the appropriate Topic.
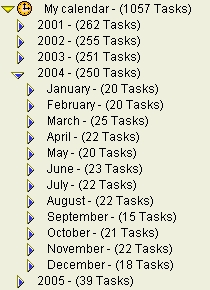
Each Calendar task in the Selector has a ![]() icon, and it’s caption contains the text of event and the alarm date and time:
icon, and it’s caption contains the text of event and the alarm date and time:
![]()
Notes: The Selector view displays only those dates which contain scheduled events. You can’t edit captions of the events or add any items into the Calendar outline. When dragging an event to another month it will be scheduled to the first day of that month.
Tip: You can move any Calendar event from one Calendar into another by dragging the event onto the desired Calendar in the Selector.
Tip: You can assign any event to a Folder.
You can specify which events should be shown in the Selector – all tasks or the alarmed tasks only.
[:] To specify the event types which should be shown in the Selector:
- Choose Menu Ribbon | Home | Options | Calendar | General
- In the Show in Selector drop-down box select the appropriate event type.
- Click OK.
[:] To close the Calendar after viewing it:
- Click the
 button at the upper right corner of the Calendar.
Note: After you open a Calendar, shortcut commands like N for Note will not be in effect.
Scheduling Events
Scheduling Events
You can schedule events in a Calendar. For example you might want to schedule an alarm to remind you of a board of directors meeting on Tuesday at 6pm.
[:] To schedule an Event:
- Choose Menu Ribbon | Home | Calendar or press F6. The Calendar window appears.
- Double-click on the desired date in the Planner window. A dialog box appears.
- In the dialog box, set the Subject, disable the All day event option to set the starting and ending time of the event and check the desired options.
- Click Save and Close button to save the event .

You can modify properties of any scheduled event by double-clicking on the event in the Planner window.
[:] To move an event to another day:
- Drag the event from the Planner window to another day in the Week/Month view or the Calendar Bar.
or …
- Click the event.
- Choose Menu Ribbon | Home | Cut.
- Select the new day and, if desired, a new time.
- Choose Menu Ribbon | Home | Paste.
Alternatively, expand the Calendar in the Selector, locate the necessary event and drag it into the appropriate Topic.
[:] To remove an event:
- Right-click the event and choose Delete.
or …
- Click the event in the Planner window and press DELETE.
Setting Time and Duration
Setting Time and Duration
You can set the time or duration of an event. For example, you might want to set the duration of a scheduled meeting to two hours.
[:] To set an event’s time and duration:
- Set the Planner to Day view.
- Drag the top edge of the event rectangle to increase of decrease the time of the event; drag the bottom edge of the event rectangle to increase or decrease the duration of the event.
Alternatively, you can right-click on the event in the Day, Week or Month view and choose Open to invoke the Edit Appointment dialog.
Marking an Event Done
Marking an Event Done
You can indicate that an event has occurred or a task is finished.
[:] To mark an event done:
- Right-click on the event in the Day, Month or Week view and choose Open to invoke the Edit Appointment dialog.
- Check Done.
- Click the Save and Close button.
Multi Day events
Multi Day events
You can schedule events lasting several days. For example, you may want to schedule a conference which lasts 5 days from Monday to Friday.
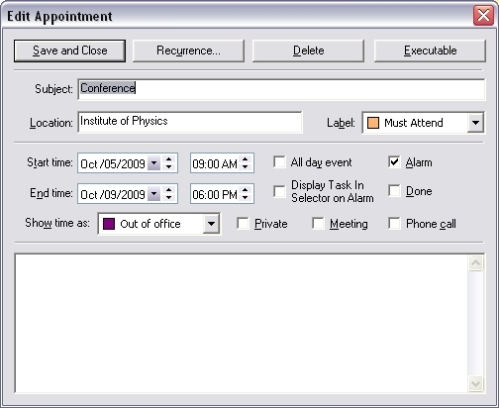
[:] To schedule a Multi Day event:
- In the Day view, schedule the first day of the event.
- Right-click on the event and choose Open from the pop-up menu.
- Set the End time for the event.
- Click Save and Close.
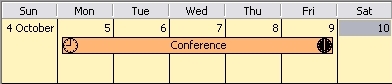
The Multi Day event will be displayed in the Month view as in the following example:
Creating Ticklers
Creating Ticklers
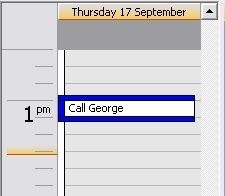
Ticklers are reminders to do something on a certain date without regard to a specific time of day. For example, you might create a tickler to follow-up on a phone call, sales lead, or order status on a certain day.
Info Select supports two types of ticklers. A Text tickler (a deprecated feature) is entered in the text of a Note. A Selector tickler is assigned directly to an item in the Selector.
[:] To create a Text tickler:
- In the Selector choose a Note or caption in which to place the tickler.
- Anywhere inside the Note or caption enter ** followed by the tickler date (you must use the date format specified by Windows under Start | Settings | Control Panel | Regional Settings | Date). For example: Call Harry on ** 7/4/2003 about the fireworks display.
When you start Info Select on that day or after, you will see that Note placed in the Search Filter reminding you to attend to the matter described. You can also manually request any due Ticklers by choosing Menu Ribbon | Selector | Add Tickler | Find due text ticklers…. To remove the resulting tickler filter choose Menu Ribbon | Home | Filter | View All Items. To deactivate a text tickler remove the **. You can disable filtering text ticklers on start up by unchecking Menu Ribbon | Home | Options | Calendar | Alarm | Show Text Ticklers on Startup.
Tip: To change the tickler marker (**) choose Menu Ribbon | Home | Options | Misc. For example, to use ##, enter “#” into the Tickler Marker box.
Ticklers remain active from the specified date until you mark them done.
You can assign a Tickler to any item in the Selector. For example, you can assign a tickler to an e-mail message which should be sent on a certain date.
[:] To create a Selector tickler:
- Right-click the item in the Selector and choose Tickler from the pop-up menu or choose Menu Ribbon | Selector | Add Tickler. A dialog appears.
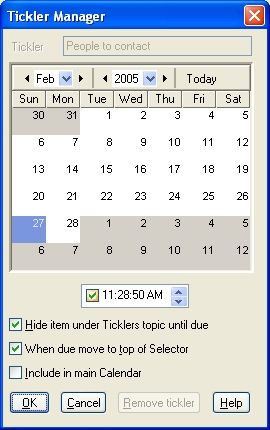
- Choose the desired date.
- Check the Tickler Time box
 and set the desired time, if necessary.
 - Click OK. An
 icon appears near the item’s caption.
When the Selector tickler is due, a ![]() icon appears on the due item.
icon appears on the due item.
Note: You can also create Selector ticklers using a Tickler Bar.
You can modify and delete Selector ticklers:
[:] To modify a Selector tickler:
- Right-click the Tickler item and choose Tickler… from the pop-up menu.
In a dialog box that appears make the necessary changes.
Click OK.
[:] To delete a Selector tickler:
- Right-click the Tickler item and choose Tickler… from the pop-up menu.
- In a dialog box that appears click Remove tickler.
Selector Tickler options
There are several options you can set for Selector ticklers:
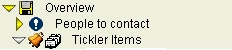
Check Hide item under Ticklers topic until due to place the item in the “Tickler Items” topic. This topic will be automatically created under the Overview topic to store Selector Ticklers. The “Tickler Items” topic is automatically sorted by Tickler Due date.
![]()
Check When due move to top of Selector if you want the item to be moved to the top of the Selector when due.
Check Include in main Calendar if you want the tickler to be added to your main Calendar. When you view the Calendar, the tickler will be displayed in the Planner View. In the Selector, the item you created the link from will have a link icon displayed next to it as well. Click on the link in Selector to open the Calendar with the linked date highlighted.
Note: New Ticklers will be added to your Main Calendar (the one with a ![]() icon).
icon).
Tickler bar
Tickler bar
The Tickler Bar is a special bar that is divided into cells which represent days of the year (the first cell represents the current date). You can use the Tickler Bar to create Ticklers in two clicks. For example, you may want to set a Tickler for a phone number you typed into the Selector, to call the number on a specific date.
[:] To set a Tickler using the Tickler Bar:
- In the Selector, choose an item.
- Choose Menu Ribbon | Edit | Tickler Bar and click on the appropriate cell in the Tickler Bar. A Selector Tickler will be created for the selected item. You can modify the properties of the Tickler by clicking on the icon near the item’s caption. choose Tickler Bar | Clear Tickler to clear the Tickler; choose Tickler Bar | Go to Tickler Items to go to Tickler Items topic in the Selector.
Note: Ticklers created using the Tickler Bar will have the same properties as the last Selector Tickler you created. For example, if the last created Selector Tickler was set to Include in Main Calendar then the Tickler created using a Tickler Bar will be also included into your Main Calendar.
You can add the Tickler Bar to the Quick Access Toolbar by checking Menu Ribbon | Home | Options | Toolbars | Show Tickler Bar.
You can adjust the Tickler Bar appearance, if necessary.
[:] To set the Tickler Bar appearance:
- Choose Menu Ribbon | Home | Options | Toolbars | Tickler Bar.
- Check Show Tickler Bar to enable displaying the Tickler Bar on the Quick Access Toolbar.
- Set the desired Tickler Bar properties:
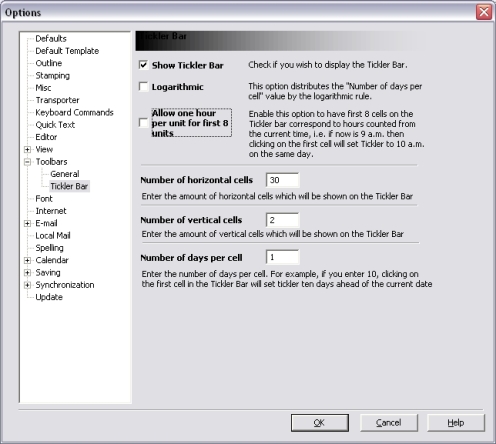 Logarithmic distributes the Number of days per cell value by a logarithmic rule;Allow one hour per unit for first 8 units sets the first 8 cells on the Tickler Bar to correspond to hours counted from the current time. For example, if it is currently 9 am, clicking on the first cell will set a Tickler for 10 am on the same day.Number of horizontal cells sets the number of horizontal divisions of the Tickler Bar;Number of vertical cells sets the number of vertical divisions of the Tickler Bar;Number of days per cell specifies the number of days days per cell. For example, if this value is set to 2 then each next cell starting from left to right will represent a date 2 days ahead (i.e. if the first cell represents 12/7/2009 then the next cell will represent 12/9/2009 and so on).
 - Click OK. With the above settings the Tickler Bar will look like this:
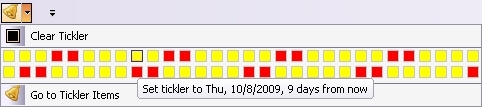
You can point your mouse to each cell to see a tip displaying the date assigned to the cell. Red cells correspond to weekends.
Recurring events
Recurring events
Recurring events are those that repeat periodically. You can create recurring events In the Calendar. For example, you could schedule weekly staff meetings, monthly payments or quarterly deadlines.
[:] To set a Recurring Event:
- In the Planner view, double click on the desired date. A dialog box appears.
- In the Edit Appointment dialog schedule the first occurrence of the event.
- Click the Recurrence button. The Appointment Recurrence dialog box appears.
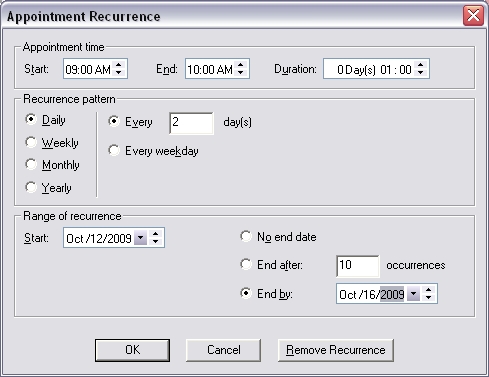
- Set the parameters.
- When finished, click OK and then click Save and Close.
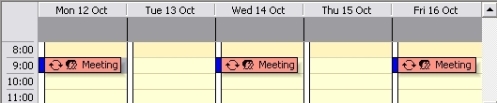
The Recurring events will be displayed in the Planner view as the following example:
Note: you can change a task from a recurring to a non-recurring event by click on Remove Recurrence button in the Appointment Recurrence dialog box.
Multiple Calendars
Multiple Calendars
You can create multiple calendars. For example, you could create one calendar for meetings and one for assorted other use.
[:] To create additional Calendars:
- Choose Menu Ribbon | Edit | Calendar. A Calendar window appears in the Workspace and a Calendar icon
 appears in the Selector.
 - Enter an appropriate caption (e.g. Marketing Dept Calendar).
- Clicking on the Menu Ribbon | Home | Calendar button (F6) will cycle through the Calendars you create.
Tip: Choose Menu Ribbon | Home | Filter | By Type | Calendars to filter out all the Calendar items.
Calendar size
Calendar size
You can set the size of the Calendar so your scheduled events and appointments can be viewed more easily.
[:] To set the size of a Calendar:
- Choose Menu Ribbon | Home | Calendar to display the Calendar.
- Position the mouse pointer on one of the edges until the cursor changes into a diagonal arrow.
- Drag the edge using your mouse.
Tip: You can dock and auto-hide the Calendar window at the top, bottom, right or left of the Workspace or Selector window.
Printing Calendars
Printing Calendars
You can print the current day, month, year or all years of a Calendar – in text or graphic format. For example, you may wish to print a Calendar prior to a business trip.
[:] To set the current day, week, month, year or all years for a printout:
- Choose Menu Ribbon | Home | Options | Calendar | Print.
- Select the desired print options. Check Include Done Items to include items marked Done. Check Include Tickler Summary to print a separate listing of Ticklers. Check Include Graphic Layout for wall calendar format.
- In the Range box, choose Year, Month, Week, or Day to print the corresponding period of time. The particular period will be determined by the day shown in the Day view. For example, if the day in the Day view is 12/25 and you choose to print a Month, the month of December will print regardless of which month is shown in the Month/Week view. Choose All to print the whole Calendar, or Current View to print the events which are visible in the current Calendar view.
[:] To print a Calendar:
- Choose the Calendar in the selector.
- Select the desired date by highlighting a cell in the Month/Week view.
- Choose Menu Ribbon | Home | Print. To preview the data to be printed click the Preview button in the Print dialog.
[:] To print a blank Calendar:
- Choose Menu Ribbon | Edit | Calendar.
- Choose Menu Ribbon | Home | Print | OK.
- Press DELETE to delete the blank calendar.
Executing Programs on Alarm
Executing Programs on Alarm
You can execute another application when an alarm occurs. For example, you may want your Antivirus program to be launched on a Weekly basis, or automatically launch your music player at a scheduled time.
[:] To enable executing programs upon an alarm:
- Choose Menu Ribbon | Home | Options | Calendar | Alarm | When an alarm occurs run the program selected for the task.
[:] To select a program to execute:
- Double-click on the task in the Planner view (or right-click on the task and choose Open). A dialog box appears.
- Click Executable. A dialog box appears.
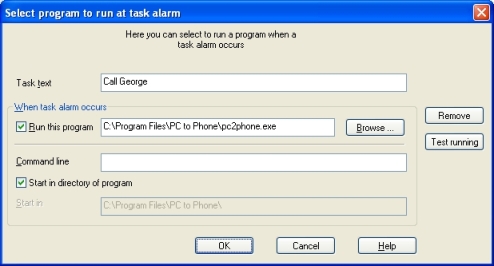
- Enter the path to the program’s executable file, or click Browse… to choose the file to launch.
- Enter any additional parameters required to launch the program into the Command Line box. Refer to the program’s manual for the information on the command line parameters.
- Check Start in directory of program if you want the program to be launched in the directory where the program’s executable file is located. Otherwise, specify the necessary Start In location. You can check the program settings by clicking the Test running button.
Click OK. The selected program will be launched when the alarm occurs.
To disable running a program, click Remove in the Select program to run at task alarm dialog.
Tip: You can also launch files associated with applications (e.g. Word Documents, PDF files, MP3 files, etc.).
Options
Options
You can set various options for the Calendar. Choose Menu Ribbon | Home | Options | Calendar | General.
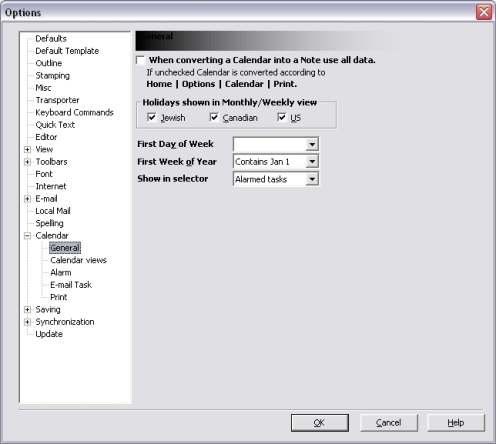
When converting Calendar to Note use all data – allows converting a Calendar into a Note. If this option is enabled, you can convert a Calendar into a Note containing all scheduled events as shown in the example below:
March
02 Tue Tklr (done) Prepare report
03 Wed 22:30 – 22:45 (done) Call George
…
02 Tue Tklr (done) Prepare report
03 Wed 22:30 – 22:45 (done) Call George
…
Jewish Holidays – displays Jewish holidays in the Planner view.
Canadian Holidays – displays Canadian holidays in the Planner view.
US Holidays – displays US holidays in the Planner view.
You can choose whether the Week starts from Monday or from Sunday by selecting the appropriate option in the First Day of Week dropdown box.
You can choose the first week of the year by selecting the appropriate option in the First Week of Year dropdown box.
You can choose which tasks should be Shown in Selector – all tasks or just the alarmed tasks.
To set the Alarm options choose Menu Ribbon | Home | Options | Calendar | Alarm.
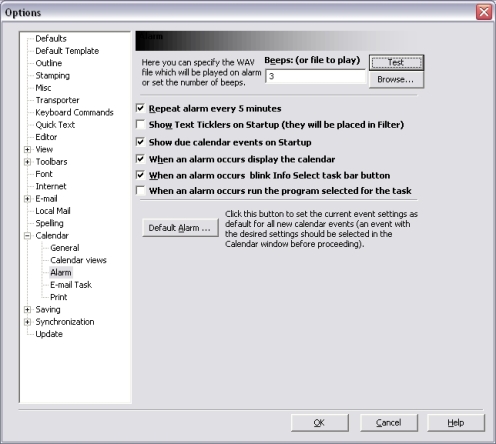
Beeps (or file to play) – sets the number of beeps given during an alarm or allows selection of a WAV audio file by clicking Browse…. Click Test to test the alarm sound.
Repeat alarm every 5 minutes – uncheck this option if you don’t want an alarm sound to repeat every 5 minutes.
Show Text Ticklers on Startup – places text ticklers in the search filter upon starting Info Select.
When an alarm occurs display the calendar – displays calendar when an alarm occurs.
When an alarm occurs blink the task bar button – when an alarm occurs the Info Select button on the Windows task bar will blink to attract your attention.
When an alarm occurs run the program selected for the task – enables executing programs on alarms.
You can decide how you want new tasks and appointments to initially appear in the Calendar.
[:] To set the default appointment format:
-
Click the Calendar toolbar button to display the Calendar.
-
Create a new appointment (enter any text).
-
Select any desired settings.
-
Choose Menu Ribbon | Home | Options | Calendar | Alarm | Default Alarm… and confirm.
-
Delete the model appointment.
Notes:
You can Delete, Cut, Copy, or Paste a range of dates from the Month view using the same method you would use for text.
When the Split command is applied to a Calendar, the Calendar will be divided in two at the currently selected day. The current day and later dates are placed in the second Calendar.
Tip: To archive old dates, select the date you want to archive before and choose Menu Ribbon | Edit | Tools | Split. Move the first Calendar to an archive Topic.
Troubleshooting
Troubleshooting
The following tips may help solve problems you may experience with the Calendar:
Make sure your system time and date are set properly.
If your Calendar appears to be blank or you can’t find your Calendar in the Selector choose Menu Ribbon | Home | Filter | By Type | Calendars. You can delete any empty Calendars.
Text Ticklers
If Text ticklers (a deprecated feature) are not working properly, make sure that your ticklers are in the date format specified by Windows. Text ticklers should match the format of the date shown in your Info Select status bar. You can change the date format under Start | Settings | Control Panel | Regional Settings | Date.
Check Menu Ribbon | Home | Options | Misc | Tickler Marker and make sure it matches your ticklers. Note, that the marker has to be doubled when you use it in ticklers.
Consider enabling Menu Ribbon | Home | Options | Calendar | Alarm | Show Text Ticklers on Startup.